For our ninth, and final for 2024, back-to-basics livestream, we went a little bit beyond the basics and covered securing your Chocolatey Agent connections to Chocolatey Central Management (CCM). We also briefly considered some general security best practices for your Chocolatey Central Management deployment itself.
This blog post gives a deeper dive than was possible during the livestream, including covering the setup that happened ahead of time and provides links to relevant documentation for further context.
Security Best Practices for Chocolatey Central Management Deployments
Before we dive into securing your Chocolatey Agent connections to Chocolatey Central Management, let’s consider some general security best practices for your Chocolatey Central Management deployment itself.
Separation of Components
It is common, especially when testing Chocolatey Central Management, to install all components on a single server. However, in a production environment, it is recommended to capitalize on the flexibility afforded by CCM being released as multiple Chocolatey packages, and install the components on separate servers. These components include:
- The CCM Database
- The CCM Web Interface: where CCM Admins log in to, manage the environment, create deployments, and view reports.
- The CCM Service: where the Chocolatey Agents communicates with.
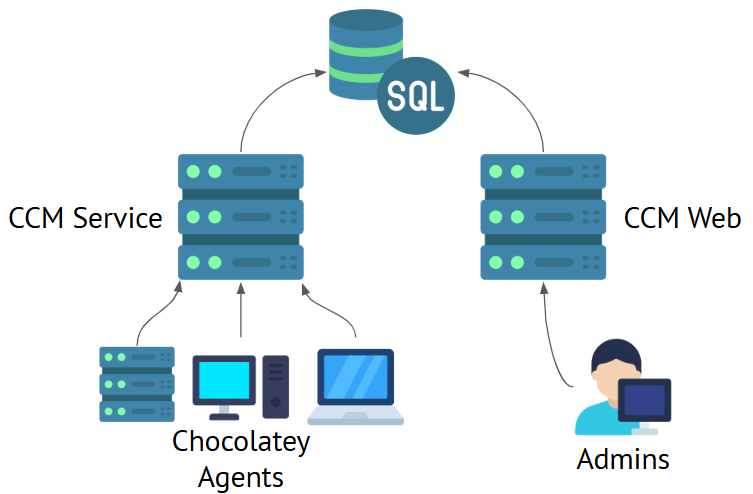
Host the Database on a Dedicated SQL Server Instance
First, host the database on a dedicated SQL Server instance. This could be SQL Server installed on a virtual machine (VM) or physical server, an Azure SQL Database, or Amazon RDS instance. This separation allows you to scale the database independently of the CCM Web interface and CCM Service components. The CCM database component is installed using the chocolatey-management-database package.
Host the CCM Service Where it is Accessible to Chocolatey Agents
Next up, install the CCM Service component on a server that is accessible to your Chocolatey Agents. This could be an on-premises server, a server in a DMZ, or a server in a cloud provider. The key is ensuring that this server is in some way isolated from the rest of your infrastructure as you will have Chocolatey Agent connecting to it from your end-user devices. This server needs to be able to accept incoming connections from Chocolatey Agent, and an outgoing connection to the database. The CCM Service component is installed using the chocolatey-management-service package.
Host the CCM Web Where it is Accessible to CCM Admins
Finally, install the CCM Web component on a server that is accessible to the administrators responsible for your Chocolatey for Business deployment, and will also need an outgoing connection to the database. The CCM Web component is installed using the chocolatey-management-web package.
You’ll notice that both the Web and the Service components need to be able to access the database. An additional consideration is to use different credentials for the Web and Service components to access the database, and to ensure that these credentials have the minimum required permissions to access the database. Not only does this mean each service has only the access it needs to run, but also that if one set of credentials is compromised then you only need to rotate those credentials and not the others.
For more details about installing CCM, see the Chocolatey Central Management Setup documentation.
Always Configure Communication Salt Additives
While the Chocolatey Agent and the Chocolatey Central Management Service communicate over HTTPS (either using a self-signed certificate or a certificate issued by a public or private Certificate Authority), it is recommended to configure communication salt additives. This is a pair of secrets that are shared between the Chocolatey Agent and the Chocolatey Central Management Service that is used to encrypt the communication between the two. This is an additional layer of security that ensures that even if the communication is intercepted, it cannot be read.
To configure these salts, set the configuration options on both CCM Service host and any Chocolatey Agent end-user devices communicating with it:
choco config set --name centralManagementClientCommunicationSaltAdditivePassword --value <Your Client Salt>
choco config set --name centralManagementServiceCommunicationSaltAdditivePassword --value <Your Service Salt>
More information about this can be found in the Config Settings documentation.
Chocolatey Agent Connection Scenarios
The main topic of the above livestream was securing the connection between Chocolatey Agent and Chocolatey Central Management using Cloudflare’s Zero Trust tunnel service. Before we get to that, however, let’s cover some other common scenarios.
While these scenarios are presented as all-or-nothing solutions, it is more likely that a real-world deployment will be a mix of these scenarios. For example, you may have some clients on your local network that connect directly, some clients connecting via a VPN, and some clients connecting via a Zero Trust tunnel.
Direct Connection on Local Network
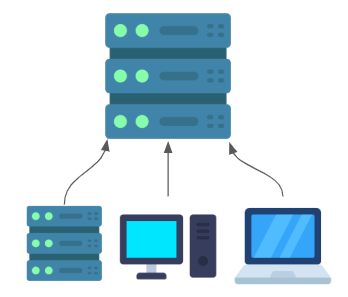
The simplest scenario is to have Chocolatey Agent connect directly to the Chocolatey Central Management Service. This is a scenario that may make sense if all of your clients are on-premises, and you’re able to host the CCM service within a network segment that is accessible to all of your clients. Your clients will just need to be able to resolve the hostname of the CCM service and connect to it over the Chocolatey Agent port (which defaults to 24020).
External Clients via Firewall rules
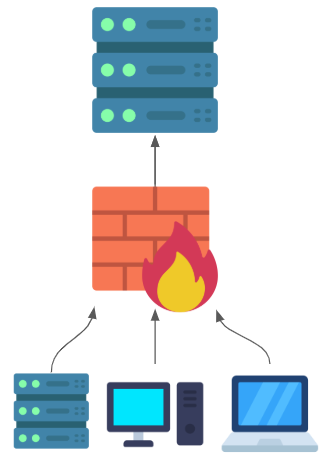
If you have clients that are external to your network, you may want to consider using firewall rules to restrict access to the Chocolatey Agent port on the CCM Service host. This is a scenario that may make sense if you have a small number of external clients, or if you have a small number of external clients that are connecting from a known set of IP addresses. You can use your firewall to restrict access to the Chocolatey Agent port to only the IP addresses of your external clients.
You do not want to use this scenario if your external clients are unlikely to have static IP addresses as you will need to update your firewall rules every time an IP address changes.
If you opt to use this scenario, it is very important to ensure that your CCM Service is installed on a dedicated server that is in a DMZ, or is otherwise segmented from the rest of the network.
External Clients via VPN
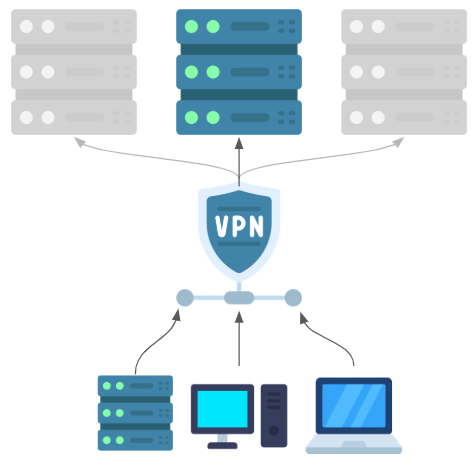
If you have clients that are external to your network, and you have a Virtual Private Network (VPN) solution in place, you may want to consider using your VPN to allow your external clients to connect to your Chocolatey Central Management Service. This is a scenario that may make sense if you have a large number of external clients, or if you have external clients that are connecting from a range of IP addresses.
Do remember that a VPN often gives the client access to a given subnet on your network, and so you will need to be aware of what other services the client can access once connected to the VPN.
External Clients via Zero Trust Tunnel
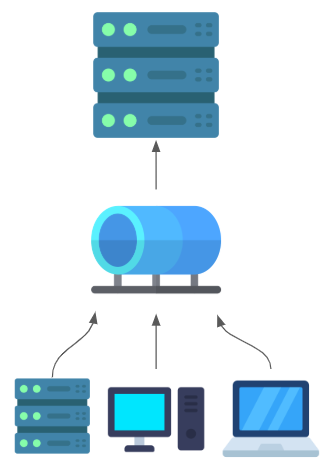
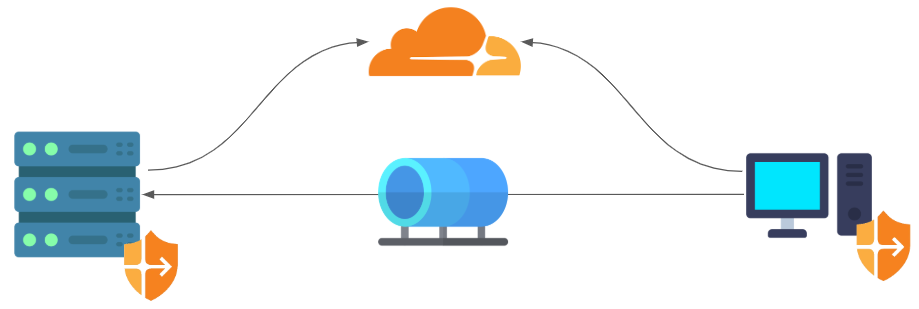
Finally, you can use a Zero Trust solution to allow your external clients to connect to your Chocolatey Central Management service via a tunnel. This tunnel allows network traffic for only a given port to be transported from a client to the CCM service host without needing direct network access or open firewall rules. Generally speaking, the Zero Trust solution will require the client to authenticate before the tunnel is established, and can even enforce that the client is in a given state (such as running a specific antivirus solution and having up to date patches installed.)
Securing Chocolatey Agent Connections using Cloudflare Zero Trust
While there are a number of services that can be used to operate a Zero Trust Tunnel, such as Teleport and Boundary, we’re going to focus on Cloudflare Zero Trust for this blog post.
Cloudflare Dashboard
There are a couple of things to consider when using Cloudflare Zero Trust. First, you’ll need a Cloudflare account, and you’ll need to have the domain you’re wanting to use for your tunnels managed by Cloudflare. There is no cost associated with this in and of itself, including the Zero Trust feature, as long as you have under 50 users.
You’ll also want to consider what host names under your domain you want to use for your tunnel. Technically you can register multiple services against a single tunnel, and each of these will need a hostname. For example, in this post we will use tunnel-ccm-web.toastit.dev for the CCM Web component and tunnel-ccm-agent.toastit.dev for a Chocolatey Agent connecting to the CCM Service.
In order to start using the Zero Trust feature, you’ll need to create a “Zero Trust organization”.
Next, configure an identity provider. This will be used to authenticate users before they are allowed to connect to your services. Cloudflare supports a number of identity providers, including Google, Okta, and Azure AD. Each of these are well documented within the Zero Trust web dashboard itself.
With that, the high level Cloudflare Zero Trust Configuration is complete. You may wish to create user groups to make policy creation easier, but from here we can start getting ready for specific the setup of our CCM tunnel.
Application Configuration
Within the Cloudflare Zero Trust dashboard you will see the term “Application”. This is the term used for a specific service, of which multiple can be associated with a single tunnel. We’re going to create two applications, one for the CCM Service itself that Chocolatey Agent will use and one for the CCM Web component that CCM Admins will use to access the CCM Web interface.
In my demo environment, I am running all the CCM components on a single server, and so we’ll be making use of a single tunnel. However, in a production environment you would likely have the CCM Service and CCM Web components on separate servers and so would have two tunnels.
These are the general steps to create an application, remember to change my example names and URLs to match your environment:
- Open the Cloudflare Zero Trust dashboard.
- Click on Access on the left side of the screen, and then Applications.
- Click the Add an application button.
- Click the Select button under the Self-hosted option.
- Enter a name for this service, such as CCM (Web) in the Application name field.
- Enter the subdomain for this service in the Subdomain field, such as tunnel-ccm-web and select your domain name from the Domain dropdown.
- You will get a warning that there is no DNS record found for this domain. We will be creating that during the Server Configuration.
- Further down this page under the Identity providers section, select the identity provider you configured earlier. If you have multiple identity providers, you can select one, multiple, or all of them.
- Click the Next button.
- Enter a name for policy that will dictate who can access this service, such as CCM (Web) Allow Admins.
- If you configured user groups, you can select them here, otherwise configure the policy to allow access to the service in the Configure rules section.
- Your policy needs to have at least one rule or group marked as Include.
- Click the Next button.
- Click the Add application button.
Repeat this process for the CCM Service now, ensuring the name and host name used reflect the difference between the two services.
Server Configuration
The official documentation for setting up a Cloudflare Zero Trust tunnel on a Windows Server can be found here. The following is the process that I personally follow:
-
Open an elevated PowerShell prompt.
-
Install the Cloudflare Tunnel client,
cloudflared, using Chocolatey CLI:choco install cloudflared -
Run the following command to add
cloudflaredas a Windows service:cloudflared service install -
Create a configuration directory for
cloudflaredunder system profile:New-Item -ItemType Directory -Path "C:\Windows\System32\config\systemprofile\.cloudflared" -
Login to Cloudflare, this will open a browser (or give you a URL to use on another system if you’re using Server Core) and ask you which domain you wish to authenticate against:
cloudflared login -
This creates a
cert.pemfile in your user profile which is used to authenticate the tunnel going forward. Copy this to the directory you created earlier under the system profile:Copy-Item -Path "$env:USERPROFILE\.cloudflared\cert.pem" -Destination "C:\Windows\System32\config\systemprofile\.cloudflared" -
Create your tunnel, giving it a unique name remembering that this single tunnel will be used for multiple services so keep it generic:
cloudflared tunnel create <Tunnel-Name> -
This creates a
.jsonfile with a GUID which is the ID that has been assigned to the tunnel. Take note of this GUID, and then copy the.jsonfile to the directory you created earlier under the system profile:Copy-Item -Path "$env:USERPROFILE\.cloudflared\<Tunnel-ID>.json" -Destination "C:\Windows\System32\config\systemprofile\.cloudflared" -
Now create a configuration file and save it as
C:\Windows\System32\config\systemprofile\.cloudflared\config.yml. I have included the config file from my demo environment, remember to change the example values and placeholders as needed:tunnel: <Tunnel-ID> credentials-file: C:\Windows\System32\config\systemprofile\.cloudflared\<Tunnel-ID>.json ingress: - hostname: tunnel-ccm-web.toastit.dev service: https://ccm.toastit.dev - hostname: tunnel-ccm-agent.toastit.dev service: tcp://localhost:24020 - service: http_status:404-
Note, if you use a self-signed SSL certificate for your CCM deployment, you may need to tell
cloudflarednot to verify the certificate:- hostname: tunnel-ccm-web.toastit.dev service: https://localhost:443 originRequest: noTLSVerify: true
-
-
You now need to tell Windows where your configuration file is when running the
cloudflaredservice:-
Open
regeditand navigate toComputer\HKEY_LOCAL_MACHINE\SYSTEM\CurrentControlSet\Services\Cloudflared -
Inspect the
ImagePath, it should currently be the path to thecloudflaredexecutable. -
Edit the
ImagePathto add the following to the end of the current value:--config=C:\Windows\System32\config\systemprofile\.cloudflared\config.yml tunnel run -
Restart the
cloudflaredservice:Restart-Service cloudflared
-
Connecting Clients
Now that the tunnel is up and running, and you have configured the services that are accessible through it, you can now connect clients through the tunnel.
First, let’s see how an admin will be able to access the CCM web interface.
In a browser, enter the hostname you configured for the CCM Web interface. In my case tunnel-ccm-web.toastit.dev. You will be redirected to your identity provider to authenticate, if you aren’t already, and then you will be able to access the CCM web interface.
This is fairly straight forward as it all happens in the browser, and the tunnel is almost invisible to the user.
Next, let’s see how we can configure a Chocolatey Agent to connect to the CCM Service through the tunnel. This is a little more involved as we need to explicitly open the client end of the tunnel. You need to install and configure Chocolatey Agent. This is well covered in the documentation, so I won’t cover it here.
Do note, that when you open the tunnel on a client, it opens ON the client. This means it is either localhost or 127.0.0.1. To keep things consistent, I suggest creating a DNS record in Cloudflare for the same hostname as what your internal clients access CCM and set that to 127.0.0.1. This allows an external client to use the hostname, and it will be seamlessly directed to localhost on the client side of the Zero Trust tunnel. This will mean you can have the same Central Management Service URL, used by Chocolatey Agent, regardless of where the client is.
To open the tunnel on a client, run the following command, ensuring you:
- Replace the hostname with the hostname of your CCM Service via the tunnel.
- Set the URL to the DNS record that you have set to
127.0.0.1. - Set the CCM service port (defaults to 24020).
cloudflared access tcp --hostname tunnel-ccm-agent.toastit.dev --url ccm.toastit.dev:24020
This will take over the console it is executed in, and you will be able to see output from cloudflared. When the console is closed, the tunnel will also close.
If you now start (or restart) the Chocolatey Agent service, it will connect to the CCM Service through the tunnel. This will either open a browser window for you to authenticate, or you will be prompted with a URL to authenticate in the console:
Restart-Service chocolatey-agent
At this point, your Chocolatey Agent is connected to your Chocolatey Central Management Service through a Cloudflare Zero Trust tunnel! However, this is a manual process and so you may want to consider running the tunnel as a service that is always running rather than relying on the user opening the tunnel and always having a console dedicated to the tunnel.
Running the Tunnel as a Service
Now we bring this all together by running the tunnel on our clients as a service. This is a little more involved than running the tunnel manually, but it means that the tunnel will always be open and available for the Chocolatey Agent to connect to.
First, we’ll be using the CredentialManager PowerShell module to store a service token ID and secret that will be used to authenticate the tunnel rather than authenticating as an individual user. This needs to be installed to allow all users on the computer to use the module, as we will be running the tunnel as the Local Service account. To do this run:
Install-Module -Name CredentialManager -Scope AllUsers
Now we need a couple of applications which we can install using Chocolatey CLI:
choco install nssm psexec
nssm is the Non-Sucking Service Manager, which we will use to register a PowerShell script which opens the cloudflared tunnel as a service. psexec is a tool from the Sysinternals suite that we will use to run the CredentialManager PowerShell module as the Local Service account, and store credentials in that context.
Now we need to create a service token with which we can authenticate the client end of the tunnel:
- Open the Cloudflare Zero Trust dashboard.
- Click on Access on the left side of the screen, and then Service auth.
- Click the Create Service Token button.
- Give the token a name. You should really only use a given token for one service and so the name should be descriptive of the service it is for.
- Specify how long the token should be valid for. Strike a balance between security and convenience, i.e. how often you’ll need to update it on your clients vs. how long it remains valid if it is compromised.
- Click the Generate token button.
- Copy the
client IDandclient secret. Note that these are presented in the form of<Header Name>: <Value>. You only need the value. - From the left-hand menu, select Applications from the Access section.
- Select your CCM Agent/Service application and then click the Configure.
- This will open the Policies page. You can either edit your existing policy or create a new one. If you edit the existing one, you will no longer be able to authenticate the tunnel with your user account and will always need to use the service token. There is no right answer here so do whatever makes sense for your environment.
- Set this policy much the same as above, with the following differences:
- Next to the Policy Name field, change the Action to Service Auth.
- In the Configure rules section, add an “include” rule with the Selector set to Service Token and the Value set to the Service Token value we just created.
- Click the Save policy button.
- Click the Save application button.
With the service token client ID and client secret, we can now save that to the Credential Manager under the Local Service account:
$CfServiceId = @{
  Target   = 'CF-Service-Token-Id'
  UserName = 'CF-Service-Token-Id'
  Password = '<Service Token Client ID>'
  Persist  = 'LocalMachine'
}

$CfServiceSecret = @{
  Target   = 'CF-Service-Token-Secret'
  UserName = 'CF-Service-Token-Secret'
  Password = '<Service Token Client Secret>'
  Persist  = 'LocalMachine'
}

$null = psexec -accepteula -nobanner -u "NT AUTHORITY\LOCAL SERVICE" powershell -command New-StoredCredential @CfServiceId 2>&1
$null = psexec -accepteula -nobanner -u "NT AUTHORITY\LOCAL SERVICE" powershell -command New-StoredCredential @CfServiceSecret 2>&1
Now we’ll create a PowerShell script which will open the tunnel using these saved credentials. For this example, I’ve saved the script as C:\Tools\ccm-tunnel.ps1:
$Token = @{
    Id     = (Get-StoredCredential -Target 'CF-Service-Token-Id').GetNetworkCredential().Password
    Secret = (Get-StoredCredential -Target 'CF-Service-Token-Secret').GetNetworkCredential().Password
}

cloudflared.exe access tcp --hostname tunnel-ccm-agent.toastit.dev --url ccm.toastit.dev:24020 --id $Token.Id --secret $Token.Secret
Other than using the Get-StoredCredential function to retrieve the service token ID and secret, this script is largely the same as the command we ran earlier to open the tunnel manually. The difference is the addition of the --id and --secret parameters which are used to authenticate the tunnel with the service token.
Finally, we’ll use nssm to create a service that runs this script:
$chocoAgentServiceName = 'choco-agent-tunnel'
if (-not (Get-Service $chocoAgentServiceName -ErrorAction SilentlyContinue)) {
  $powershellPath = ( Get-Command powershell ).Source
  $serviceScriptPath = 'C:\Tools\ccm-tunnel.ps1'
  $serviceArgs = '-ExecutionPolicy Bypass -NoProfile -File "{0}"' -f $serviceScriptPath
  $null = nssm install $chocoAgentServiceName $powershellPath $serviceArgs
  $null = nssm set $chocoAgentServiceName ObjectName "NT AUTHORITY\Local Service" ""
  $null = nssm set $chocoAgentServiceName DisplayName Cloudflare Tunnel - Choco Agent
  $null = nssm set $chocoAgentServiceName Description Maintains a persistent Cloudflare Zero Trust tunnel to CCM.
}
These commands create the service which opens your tunnel, give it a nice display name and description, and change the user under which it runs to the Local Service account.
To wrap this up, start the service you just created and restart the Chocolatey Agent service:
$chocoAgentServiceName = 'choco-agent-tunnel'
Start-Service -Name $chocoAgentServiceName
Restart-Service chocolatey-agent
Bonus Configuration
There are two enhancements you may which to make to ensure this tunnel configuration is as robust as possible.
Delay Tunnel Opening
You can set the tunnel service to start automatically, but with a delay. This ensures that the network stack has fully initialized on the client before the tunnel is opened:
$chocoAgentServiceName = 'choco-agent-tunnel'
nssm set $chocoAgentServiceName Start SERVICE_DELAYED_AUTO_START
Start Chocolatey Agent Only When the Tunnel is Ready
You can make the Chocolatey Agent service dependent on the tunnel service, forcing Chocolatey Agent to start only after the tunnel is up and running.
$chocoAgentServiceName = 'choco-agent-tunnel'
nssm set chocolatey-agent DependOnService $chocoAgentServiceName
NOTE
It is normal to get a message about the
chocolatey-agentservice not being an NSSM service. This is because that service wasn’t created using NSSM, but the command will still work.
Wrap Up
There was a lot of client setup scripting in this post. Once you have the scripts in hand, the process is easily repeatable. Using a Chocolatey Package for the scripts allows you to set up a client by installing a single package. There may be a post on about this type of package coming soon!
This is the ninth post in our back-to-basics series, and we look forward to continuing to expand the series in 2025. Please do let us know if there are specific topics you would like to see covered!
If you’ve got any questions about this post, Chocolatey for Business, or other Chocolatey products, please reach out to us on our Community Hub!
Share On
Posted In
Popular Tags
- #news 75 Number of post with tag news
- #press release 59 Number of post with tag press release
- #chocolatey for business 49 Number of post with tag chocolatey for business
- #packaging 23 Number of post with tag packaging
- #open source 19 Number of post with tag open source
- #community 16 Number of post with tag community
- #tutorial 16 Number of post with tag tutorial
- #chocolatey community repository 13 Number of post with tag chocolatey community repository
- #12 days of Chocolatey 2023 12 Number of post with tag 12 days of Chocolatey 2023
- #podcast 12 Number of post with tag podcast


