What Is Chocolatey GUI, Self Service and the Chocolatey Agent Background Service?
What Is Chocolatey GUI, Self Service and the Chocolatey Agent Background Service?
 By Gary Ewan Park |
Posted Thursday, May 2, 2024
By Gary Ewan Park |
Posted Thursday, May 2, 2024 In our fourth back-to-basics blog post, we’re going to take a look at Chocolatey GUI, using Chocolatey CLI in Self Service mode, and the work of the Chocolatey Agent’s Background Service.
In our first three blog posts, we found out what the Chocolatey Community Repository is, and how to create your own packages, and we also learned exactly what Chocolatey CLI is. Now that we have this information at hand, we can begin exploring how Chocolatey CLI and Chocolatey GUI can be used in a Self Service mode with the Chocolatey Agent Background Service, which is a common requirement for our Chocolatey for Business customers.
What Is Chocolatey GUI?
If you’re familiar with what Chocolatey CLI is, you’ll know that it works from the command line. But what do you do if you want the power of Chocolatey CLI, visually, using a graphical user interface (GUI)?
Chocolatey GUI provides the more commonly used functionality of Chocolatey CLI, using an interface that is immediately familiar and usable. It’s commonly used by organizations to give colleagues a familiar interface to self-serve their own software, without giving them Administrator privileges.
What Is Self Service?
Self Service allows colleagues to selectively manage packages, and the software they provide, on their computer without providing them with Administrator privileges, normally required for managing software on Windows.
The important part of Self Service is that the person installing or managing the software may not have permission to install software. But using Chocolatey Agent you can control what they can manage, and what they can install or uninstall. In addition, by controlling the list of packages, and therefore software, that can be installed, Administrators have a clearer understanding of what can be installed across the entire organization.
Behind the scenes, the functionality of Self Service is provided through Chocolatey Agent using a feature known as “Background Service”. This feature ensures that Chocolatey packages, and therefore the software managed by them, are managed by a user account with the Windows required permissions that Chocolatey Agent controls.
With the Background Service feature of Chocolatey Agent enabled, both Chocolatey CLI and Chocolatey GUI, can take advantage of it and allow packages to be managed.
What Is Chocolatey Agent?
Chocolatey Agent uses a Windows Service, which along with other features, provides the Self Service implementation that is used by both Chocolatey CLI and Chocolatey GUI.
Chocolatey Agent is the client-side component of Chocolatey Central Management, facilitating both the communication of the local package state, and executing Deployment Plan Steps.
What Is a Source?
Before we go further, we should really define what a ‘source’ is in the context of both package managers, and Chocolatey products. This is an important consideration when it comes to the Chocolatey Agent configuration.
A ‘source’ is a location (sometimes also referred to as a ‘feed’) where Chocolatey CLI can find information about packages. Chocolatey CLI comes pre-configured with one source: the Chocolatey Community Repository which we learned about in our first back-to-basics blog post and livestream.
You can run your own Chocolatey package source. This can be a simple file share, or a dedicated repository manager such as Sonatype Nexus or JFrog Artifactory. We have extensive documentation on hosting your own packages internally to help you decide what is best for your organization.
Hosting a Chocolatey packages source allows you to have complete control over which packages can be installed, or otherwise managed.
To see which sources Chocolatey CLI currently has configured, you can run the following command:
choco source list
To create a new source, for example to add a repository that you have created, you would run the following command, remembering to replace the --source value with your own URL:
choco source add --name="my-internal-source" --source="https://my-internal-source/api/v2/"
How Do I Install Chocolatey Agent?
To use Chocolatey Agent, ensure you also have Chocolatey Licensed Extension installed and a valid Chocolatey license file in place.
Like all Chocolatey products, Chocolatey Agent is installed using its Chocolatey package, by running the following command:
choco install chocolatey-agent
Once installed you need to configure Chocolatey CLI to use Chocolatey Agent to perform actions.
How Do I Configure Chocolatey Agent?
We are only going to cover a few commands to provide the Self Service functionality with Chocolatey Agent. However, the documentation covers the extensive options available for Chocolatey Agent.
The following three commands are what we need to run to configure Chocolatey CLI and Chocolatey Agent:
choco feature disable --name="'showNonElevatedWarnings'"
choco feature enable --name="'useBackgroundService'"
choco feature enable --name="'useBackgroundServiceWithNonAdministratorsOnly'"
- As Windows requires Chocolatey CLI to ordinarily need to be run by an account with Administrator privileges, and we will be using Self Service with accounts that do not have Administrator privileges, helpful warnings will be shown to remind us. As we are intentionally doing this, we don’t need those warnings so we can disable them.
- This command enables Chocolatey CLI to use the Chocolatey Agent Background Service for commands to be run.
- Chocolatey CLI and Chocolatey GUI will, by default, pass commands from all users to the Chocolatey Agent Background Service. In the case of user accounts with Administrator privileges, this is unnecessary. By enabling this feature, we are limiting the accounts that commands are passed from, to be non-Administrators only.
Configure Self Service Sources
NOTE
By default, each source must be individually configured to allow Self Service. However, you can disable the
useBackgroundServiceWithSelfServiceSourcesOnlyfeature, which is enabled by default, to allow all sources to be used for Self Service without the need to configure them individually. For security reasons we do not recommend you disable this feature.
As mentioned in our previous back-to-basics blog post, Chocolatey CLI is secure by default. This continues with Chocolatey Agent and the Background Service by only allowing use of sources that have been specifically enabled for Self Service.
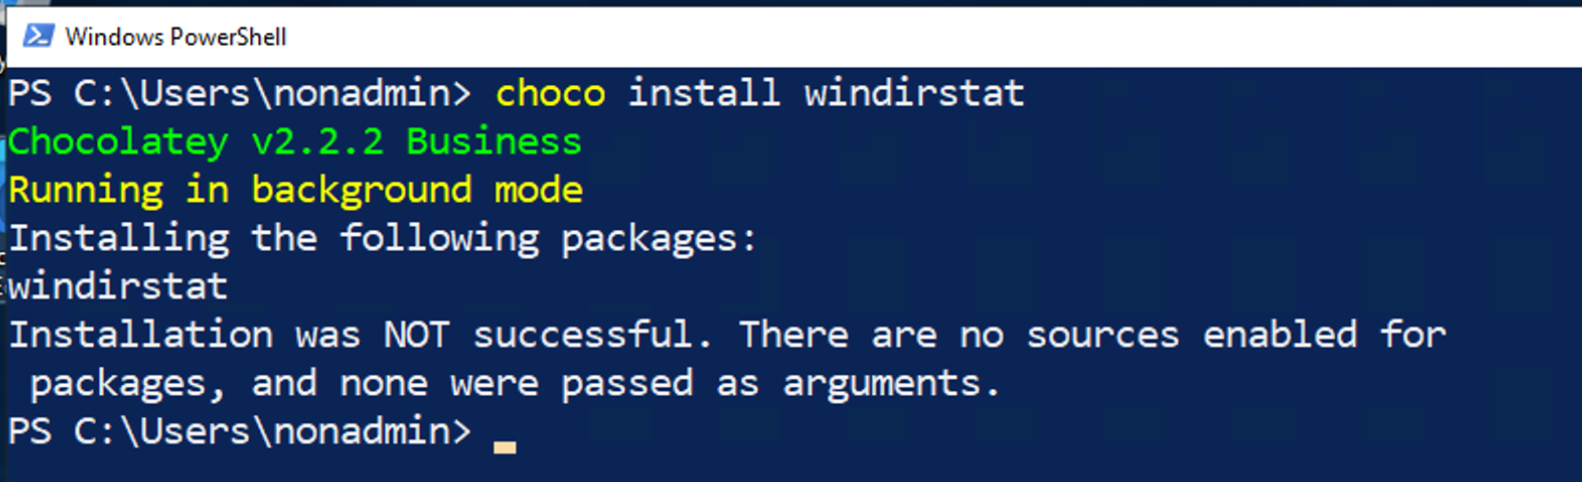
While logged in as a non-administrator user with the configurations above applied, running the command choco install windirstat, will give you the following error as none of the sources available are configured for Self Service:
WARNING
Sources should only enable Self Service after careful consideration.
To configure a Self Service source, add the --allow-self-service option to the command line, remembering to replace the --source value with your own URL:
choco source add --name="my-internal-source" --source="https://my-internal-source/api/v2/" --allow-self-service
Can Everyone Use Chocolatey Agent?
Self Service and the Background Service are features of the Chocolatey Agent product, and available as part of the Chocolatey for Business suite. See the product comparison for more information.
Got Questions?
Check the Self Service Anywhere feature page, the Chocolatey Agent setup FAQ, reach out for community assistance on our Community Hub Discord Server, or contact Chocolatey Support (run choco support for more information).
Summary
This is the fourth in our back-to-basics series. Chocolatey CLI, Chocolatey GUI and Chocolatey Agent all work together to allow your colleagues to self serve packages and software on their own computers, in a safe, secure and controlled way, providing the Administrators with confidence of what is deployed across the entire organization.
Popular Tags
- #news 75 Number of post with tag news
- #press release 59 Number of post with tag press release
- #chocolatey for business 49 Number of post with tag chocolatey for business
- #packaging 23 Number of post with tag packaging
- #open source 19 Number of post with tag open source
- #community 16 Number of post with tag community
- #tutorial 16 Number of post with tag tutorial
- #chocolatey community repository 13 Number of post with tag chocolatey community repository
- #12 days of Chocolatey 2023 12 Number of post with tag 12 days of Chocolatey 2023
- #podcast 12 Number of post with tag podcast


