Extending Chocolatey Packaging at Walmart
Extending Chocolatey Packaging at Walmart
NOTE
Originally posted on Puppet’s blog. Reposted with permission.
At Walmart, we’re on the journey of increased automation and efficiency. We decided to stop using gold images for server deployments early on. We knew that by separating the base Windows image from the configuration and application installs, deployments would be faster and more consistent. Additionally, application teams would no longer have to wait for the server teams to recut and publish a new gold image throughout the environment every time the application teams released a new version.
Our first iteration of the new server build process used Microsoft Desired State Configuration (DSC) to configure the servers. We were elated at how quickly we were able to build servers using DSC. We had a concern, though: lack of management tooling for DSC and application installs. Originally, we created our own management tooling around DSC. It worked great initially, but development was slow, and more time was spent on the tooling than on the servers themselves.
We knew this had to be a solved problem, so we talked to our Linux teammates about Puppet. Puppet could already manage Windows servers, and with the introduction of the Puppet DSC module, we could extend Puppet management to DSC resources. We could use modules from both the Puppet and PowerShell communities, which greatly increased what could be managed.
We still weren’t sure how to handle the on-demand application installs. Originally we used the DSC package resource, but we ran into some quirks. DSC Package uses the GUID of the application to manage the install. Not only do you have to know the current GUID, but if you want to uninstall a previous version of the application, you have to know the GUID for each version that could possibly be installed. DSC Package also requires a separate configuration to download the application install file to the server. With every new application revision, no matter how minor, we would have had to change several parts of the DSC configuration.
It was then that Chocolatey came to the rescue. With Chocolatey, you don’t need a GUID, just the application version. The Chocolatey package handles all the downloading and installing. If you’re hosting internal packages, you can even embed the install file into the Chocolatey package itself to further streamline the process. All the application owner has to do is create a new Chocolatey package, and update the app version number in Puppet.
We knew that in order to increase adoption of our new tools and processes, we would have to remove as many roadblocks as possible. Since Chocolatey is a command line tool, we were able to automate portions of the package creation process. Automating package creation lowers the learning curve of Chocolatey. It also helps us get one step closer to continual delivery on Windows. We can take what we’ve done and easily hook it into tools like Jenkins to create and push new packages whenever application teams release a new version.
We started by determining the basic workflow for the users:
- Ask the user for package information.
- Use package information to build the package from a template.
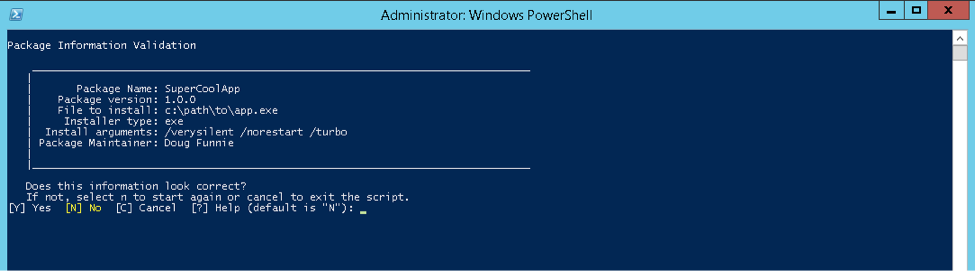
Here’s an example of an application being packaged using our automation script. We ask only for the package name, path to the application, additional install arguments, and the maintainer name (it defaults to the user running the script if left blank).

Before beginning the packaging, the user is asked to confirm the information provided. If the user selects No, they’re able to go through the input process again.
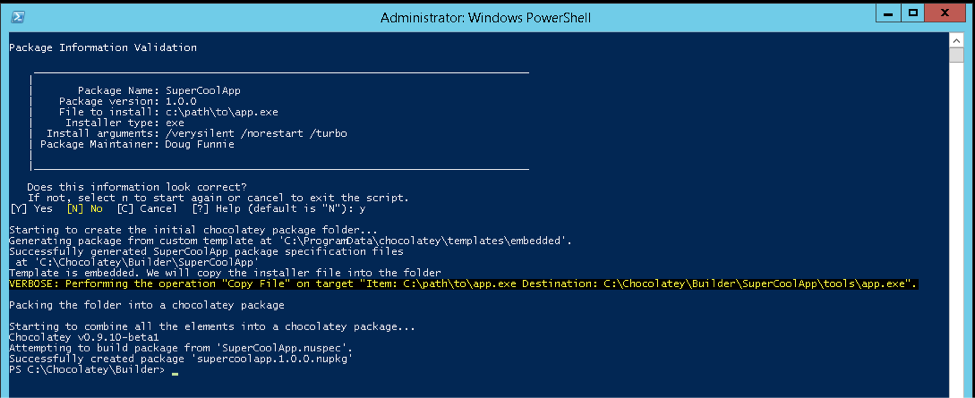
The script calls choco new to create the package. Currently it defaults to using the embedded packaging model, so the script copies the installer file into the appropriate folder. Then it calls cpack to create the nupkg file.
While we can’t share our exact script, we can walk through some of the automation process. Using Chocolatey’s package templates, we knew could dramatically simplify the package creation process. Before templates, we had planned on using PowerShell here-strings to build out the files for the package. However, the large here-strings tended to clutter up a script, and became complicated when we used more than one packaging model.
We used the Chocolatey docs page on templates to create our own. To keep things simple, we started with only two templates: basic and embedded. Our basic template uses the standard Chocolatey practice of install files being located in an external location. Since we’re using only internal Chocolatey hosting though, we can include the installer files in the Chocolatey package itself. Using the Chocolatey docs, we created our embedded template. The chocolateyinstall.ps1 script will run the installer file inside the same folder. For the rest of this example, we’ll be using the embedded template.
From the docs, we know the default template values we can pass in. You can also find these properties from the help by running choco new –h.
- packageversion
- maintainername
- maintainerrepo
- installertype
- url
- url64
- silentargs
By following the instructions in the docs, we can create a simple embedded template. Below is the tools\chocolateyinstall.ps1 file for the embedded template.
$ErrorActionPreference = 'Stop'; # stop on all errors

[[AutomaticPackageNotesInstaller]]
$packageName  = '[[PackageName]]'
$toolsDir     = "$(Split-Path -parent $MyInvocation.MyCommand.Definition)"
$fileLocation = Join-Path $toolsDir '[[url]]'

$packageArgs = @{
  packageName   = $packageName
  file          = $fileLocation
  fileType      = '[[InstallerType]]' #only one of these: exe, msi, msu
  silentArgs    = '[[silentArgs]]'
  validExitCodes= @(0, 3010, 1641)

}

Install-ChocolateyInstallPackage @packageArgs
To increase readability in the following example, we’ve used the backtick in PowerShell to do line continuation. We’ve also added three additional parameters at the end. The accept license property accepts license dialogs automatically. The force property creates a new package, even if there’s already one in the current directory. Since we’re automating the process so users don’t have to touch any folders or files manually, we want to overwrite whatever is currently there. The limit output property isn’t required to build a new package, but we use it for our scripts to make parsing the return output easier.
$name = 'SuperCoolApp';
$template = 'embedded';
$packageversion = '1.0.0';
$maintainername = 'Doug Funnie';
$url = 'app.exe';
$installertype  = 'exe';
$silentargs = '/verysilent /turbo'

choco.exe new $name `
    --template $template `
    --version=$packageversion `
    --maintainer=$maintainername `
    url=$url `
    installertype=$installertype `
    silentargs=$silentargs `
    --acceptlicense --limitoutput --force
Running this script produces the following output (if you run it without the –limitoutput property, your output will include every file generated which can be useful for troubleshooting).

Looking at the chocolateyinstall.ps1 file in the SuperCoolApp\tools folder shows that the template properties have been replaced with the values that were passed into choco new.
$ErrorActionPreference = 'Stop'; # stop on all errors

$packageName  = 'SuperCoolApp'
$toolsDir     = "$(Split-Path -parent $MyInvocation.MyCommand.Definition)"
$fileLocation = Join-Path $toolsDir 'app.exe'

$packageArgs = @{
  packageName   = $packageName
  file          = $fileLocation
  fileType      = 'exe' #only one of these: exe, msi, msu
  silentArgs    = '/verysilent /norestart /turbo'
  validExitCodes= @(0, 3010, 1641)

}

Install-ChocolateyInstallPackage @packageArgs
Unfortunately, this won’t create a fully working Chocolatey package yet. There’s no template property for the embedded installer file name in $fileLocation. In versions prior to Chocolatey 0.9.10, you can’t pass in arbitrary key value pairs. We just have to get a little creative until then, so in our embedded template we used [[url]] to pull double duty. Since we’re not pulling the install files remotely, the url property is free for us to use.
You may have noticed that we don’t ask for the file type in our script, and we provide default silent arguments. After Chocolatey 0.9.10 is released, the possibilities for template creation will be greatly increased by the ability to pass in custom values. We want the package creation process to be as simple for the end user as possible, so we use the information provided in the file path to fill in the $fileType and the default silent arguments we use. If a user provides a file path that doesn’t use a supported file type, we write an error instructing them on what file types are approved for use.

Using the file path, we pull the file extension to use in $fileType. We then use that extension to make sure that the no restart and silent install values are always included in the arguments. We can’t put these in our template since they change depending on the file extension, and creating separate templates formsi-embedded and exe-embedded would be kludgy. By adding the installer type and default silent arguments, we’re able to increase the usefulness of the script. All that’s left is to copy the file to the folder and then run cpack on the nuspec file.
$name = 'SuperCoolApp';
$template = 'embedded';
$packageversion = '1.0.0';
$maintainername = 'Doug Funnie';
$filePath = 'app.exe';

# Generate the installertype and silent arguments
$installertype = $installfile.Split('.')[-1]
switch ($installertype)
{
    'exe' {$silentargs = '/verysilent /norestart '}
    'msi' {$silentargs = '/qn /norestart '}
    'msu' {$silentargs = '/qn /norestart '}
    Default { Write-Error "Unknown file extension: $installertype . Please use an exe, msi, or msu"; exit}
}

$silentargs += "/turbo"

# Generate package
choco.exe new $name `
    --template $template `
    --version=$packageversion `
    --maintainer=$maintainername `
    url=$url `
    installertype=$installertype `
    silentargs=$silentargs `
    --acceptlicense --limitoutput --force

# copy the file over
# then run cpack on the nuspec file
cpack.exe .\$name\$name.nuspec
While we’ve done all this in PowerShell, you don’t have to. The real beauty of command line tools like Chocolatey is that your favorite automation tool or language of choice can be used. Using local scripts to just create the packages isn’t all you can do, either. From here, the options are endless: create a web front end, hook into Jenkins to build packages automatically after a build, etc.
Your manager may chuckle when you say you’re going to use Chocolatey, but after a little scripting the only sound you’ll hear are dropped jaws as applications are automagically deployed.
Derek Robinson is a Windows server administrator at Walmart.
Written By:
Derek Robinson
Popular Tags
- #news 74 Number of post with tag news
- #press release 58 Number of post with tag press release
- #chocolatey for business 49 Number of post with tag chocolatey for business
- #packaging 23 Number of post with tag packaging
- #open source 18 Number of post with tag open source
- #community 16 Number of post with tag community
- #tutorial 16 Number of post with tag tutorial
- #chocolatey community repository 13 Number of post with tag chocolatey community repository
- #12 days of Chocolatey 2023 12 Number of post with tag 12 days of Chocolatey 2023
- #podcast 12 Number of post with tag podcast


